Thursday, May 8, 2008
Wednesday, April 9, 2008
A trip around the LV&N
Here is a trip around my layout as it looks today.First picture is a shot of East Curan Yard.
Here trains come in from the prairies before the long haul through the mountains.
Here is a shot of Curan Station and the west side of the yard.
This is looking east. I'm still playing with different pictures of buildings on the backdrop as you can see. The far corner needs a couple of tall warehouses as well.
At the western edge of Curan yard are the engine refueling facilities. You can see the start of the Rocky Mountains in the background. Better take on lots of fuel and sand for the trip through those babies!
Turning the corner we see the makings of my future ethenol plant. Notice the garin bins. I had first wanted to buy two more and then last month MR had the article in it where Jim Hediger had cut them in half for his ethenol plant. Thanks Jim!
Continuing west we see the future branch line at the lower level. It comes out from the hidden staging tracks which will be under Curan yard.
Looking back the other way you get a view of the first peninsula. This will be the main focal point of the layout with a coal mine in the middle surrounded by rocky peaks and bridges all the way around.
The first bridge will represent Anderson Creek Bridge near Boston Bar, BC.
Turning the corner trains will cross a big rock cut on the other side of the peninsula. This will be the first thing you see when entering the layout under the duckunder.
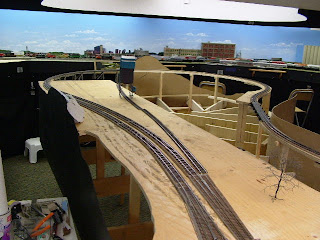
We continue west and cross another big valley snaking toward the next peninsula where trains will slowly descend to a lower level matching up with the height of my hidden staging yard under Curan yard. You will also have the option to stay high and enter Curan yard again. Note the branch line cutting across under this section in the distance.This is the start of the next peninsula.
My current junk table. Against the wall you can see where I have temporarily cut across so I can run trains all the way around.
The end of the run brings us to the coast and the future container yard. Here trains duck behind the backdrop and enter the hidden staging under Curan Yard.
That's it. Hope you have enjoyed the trip.
Saturday, March 29, 2008
Card stock building fun.
Was sent a link to some great little card stock buildings you can download from the internet. Here is my son putting one together. He did the whole thing by himself. Only thing he needed some help with was to hold the tabs on the longer walls while the glue dried.
Thanks for the link John!
Tuesday, March 18, 2008
Curan Elevators
Now that I've finished installing the turnouts that lead to the grain elevator spurs it's time to start on the elevator. The silos are made from pvc piping that have been hot glued together and the main handling building will be kitbashed from sheet styrene.
Sunday, March 9, 2008
Lyn Valley custom made switches
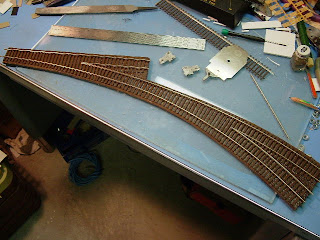
All switches on the Lyn Valley NorthWestern are hand made. I have experimented with different ways of installing them. Some create more mess and installation problems than others. Here is my latest attempt to perfect the process.
I start by putting a piece of homasote through a planer until it matches the thickness of cork roadbed.
After the the general layout of the switch has been traced on a piece of paper the same shape is cut out of the homasote. Then the ties are glued down and spraypainted a base colour of brown. I use code 83 flex track and strip the rail from it rather than buying the bare rail. Just easier to find that way. Not sure if the cost is that much different either. I start on one side and work across the switch to the other side filing the rail where needed (ie. switch points & frog). Spikes are used every four ties or so.
Now it's time to add the switch points and the guard rails. I find the hardest part of this process is making sure the bend at the frog is in the right spot and at the right angle. I makes a difference in how the wheels run through the frog.
Once everything has been spiked down and I'm satisfied the spacing of the rails is proper throughout the switch I fill the frog full of solder and add a piece of brass stock to the end of the points. Length of the brass stock is determined by the flange gap needed for the wheels.
Now I take a piece of hack saw blade and run it back and forth through the frog. The width of the blade is just right. Once satisfied I have made the gap deep enough I file the top of the frog to smooth everything out.
A quick trim the ties to the proper width and the switches are given a coating of Polly Scale Rail Tie Brown. The switches are now ready to install on my layout. What I like about this method is the fact that it makes the least amount of mess and I can build it all at my bench. My earlier methods used a full 1/2" of homasote that need to be routered down into the plywood to get to the same height as my cork roadbed. Dust everywhere! By building my own switches I can match the switch to my layout rather than having to design my layout around the shape of the switches. At about $4.00 each to build it's worth the time it take to build one as well.
Here is the finished product installed and ballasted.
Tuesday, March 4, 2008
East Curan Transfer Center
Located at the east end of Curan Yard, East Curan Transfer Center is my latest project. Raw styrene sheet is great! The platform is made from .060" sheet weathered with chalks again and the asphalt lot is .020" styrene also smudged up with black and brown chalks. The turnouts leading into Curan Yard are all handmade. Can you tell?
Curan Warehousing
Curan warehousing was scratchbuilt from styrene sheet and pictures of bricks I printed from a CD. I found glueing the brick pictures on with contact cement rather than water based glues keeps the paper from wrinkling. Added some Grandt Line windows and then styrene strips to the outside. Building has been weathered with chalks. Not sure I like the weathering effect but that can always be changed.
Monday, March 3, 2008
Newton Bearing Corp.
My first kitbashed building flat. I used a well known Kibri kit. I painted the bricks with a sand color and wiped it off before it dried too much. This left the mortar joints looking like mortar. Still need to weather but pleased with the overall result so far.
Subscribe to:
Posts (Atom)