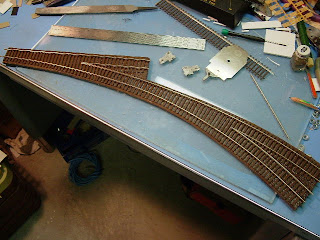
All switches on the Lyn Valley NorthWestern are hand made. I have experimented with different ways of installing them. Some create more mess and installation problems than others. Here is my latest attempt to perfect the process.
I start by putting a piece of homasote through a planer until it matches the thickness of cork roadbed.
After the the general layout of the switch has been traced on a piece of paper the same shape is cut out of the homasote. Then the ties are glued down and spraypainted a base colour of brown. I use code 83 flex track and strip the rail from it rather than buying the bare rail. Just easier to find that way. Not sure if the cost is that much different either. I start on one side and work across the switch to the other side filing the rail where needed (ie. switch points & frog). Spikes are used every four ties or so.

 Now it's time to add the switch points and the guard rails. I find the hardest part of this process is making sure the bend at the frog is in the right spot and at the right angle. I makes a difference in how the wheels run through the frog.
Once everything has been spiked down and I'm satisfied the spacing of the rails is proper throughout the switch I fill the frog full of solder and add a piece of brass stock to the end of the points. Length of the brass stock is determined by the flange gap needed for the wheels.
Now I take a piece of hack saw blade and run it back and forth through the frog. The width of the blade is just right. Once satisfied I have made the gap deep enough I file the top of the frog to smooth everything out.

A quick trim the ties to the proper width and the switches are given a coating of Polly Scale Rail Tie Brown. The switches are now ready to install on my layout.

What I like about this method is the fact that it makes the least amount of mess and I can build it all at my bench. My earlier methods used a full 1/2" of homasote that need to be routered down into the plywood to get to the same height as my cork roadbed. Dust everywhere! By building my own switches I can match the switch to my layout rather than having to design my layout around the shape of the switches. At about $4.00 each to build it's worth the time it take to build one as well.
Here is the finished product installed and ballasted.


 Now it's time to add the switch points and the guard rails. I find the hardest part of this process is making sure the bend at the frog is in the right spot and at the right angle. I makes a difference in how the wheels run through the frog.

 What I like about this method is the fact that it makes the least amount of mess and I can build it all at my bench. My earlier methods used a full 1/2" of homasote that need to be routered down into the plywood to get to the same height as my cork roadbed. Dust everywhere! By building my own switches I can match the switch to my layout rather than having to design my layout around the shape of the switches. At about $4.00 each to build it's worth the time it take to build one as well.


